Back in September I had spoken to Megan and Jay of the amazing band Fine Mist about helping them make some t-shirts. They needed help because they were trying to recreate a design that had originally been done in scotch tape and gold spray ink on one shirt, but were unable to make multiples because the tape was destroyed when they peeled it off the shirt. Megan really liked the spray paint look and that the tape masked off the words “FINE MIST” leaving the lettering the original shirt colour.
As a screen printing nerd, I found their project interesting because it presented quite the challenge because it required inverting the printing process. I had thought that we could use masking tape to create the lettering and then block it out properly using screen filler. However, when I was gathering my supplies and making the screen I started to wonder if using a screen would prove problematic because the spray ink would either dry on the screen or clog it entirely if the spray was not powerful enough to penetrate the screen after being sprayed. Nevertheless, we had to try using a screen because it presented the simplest way of producing shirts in runs rather than one at a time. Or at least we thought.

Screen attempt = fail.
After spending a couple of hours creating letters out of tape and carefully arranging them on a screen, we were ready to print. However, we only were able to produce one shirt that night because the ink did clog the screen, which meant that we would have to wash the screen out and start over once it dried. I can feel the ghosts of Ford, Taylor and Disney shuddering at my failed attempt to industrialize a process and the lost hours of labour. But R&D is forever fraught with inefficiencies and it was still fun hanging out with Megan, Jay and Kate, eating pizza and bedazzling the cuffs of a hoodie belonging to Edo Van Breemen of Brasstronaut.

Bedazzled! The red is for stigmata.
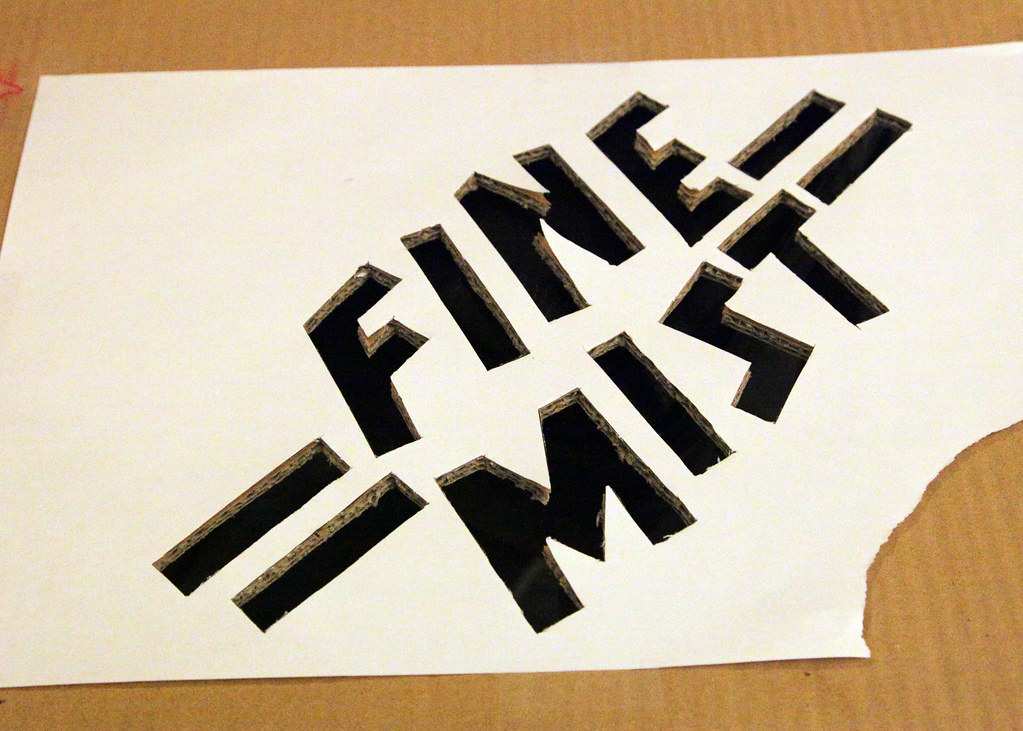
Back at the drawing board (a.k.a. watching season 3 of Dexter) I came upon the notion of cutting the letters out of cardboard and fixing them to a frame by using either fishing line or a really thin wire. Since I already had a photo of the lettering I was able to reproduce it exactly as it was by tracing the letters in illustrator and then printing out the PDF.

Tools
1 roll of duct tape
1 roll of 30 gauge flower and craft wire
2 30 inch canvas frame pieces (I got mine at Opus)
2 22 inch canvas frame pieces
1 pair of wire cutters
1 box cutter
1 x-acto knife
2 printouts of the lettering
1 large sheet of thick cardboard (I had some in my apartment because I’m a craft hoarder)
1. Build the frame and secure it by taping the corners using the duct tape. I used about 6 inch strips on the long and short side to really lock the pieces together.
2. Tape the printout to the cardboard and cut the outline of the letters using the box cutter. Since the cardboard was really thick, I used my x-acto knife for the more delicate final cuts. Leave the cut letters in the cardboard.
3. Flip over the cardboard and place the frame around it, with the front of the frame facing down. Position the cardboard to make sure that the letters aren’t too close to the edge since we do not want to create hard lines when spraying.
4. Start running the wire from one edge of the frame to the other, making sure that it runs across the top part of each of the letters. Secure the first edge by winding the wire around the frame and then using the duct tape to secure it firmly. Stretch out the wire so it’s taut before securing it to the frame. Or start taping down the wire to the letters before securing the other edge. I didn’t find any advantage to doing it in either order. Once everything is secured, repeat the process for the bottom of the letters. Since we were doing two words with dashes, I then repeated this step for the other word.

5. Now that the lettering has been secured to the wire, pop out the letters from the cardboard and check to see if there is any slack to the wire. If there is slack (there was in the mine), simply press down wire against the frame and secure it with duct tape. And then you’re done! I had to do some small adjustments to the dashes, but they stayed in place even though they only had one line behind them.

pre-spray
Click here to check out Fine Mist’s Myspace page
Click here to check out tracks from Fine Mist related projects, like Jay’s new solo EP, last year’s Jay Division
Click here to get Jay’s new EP Bird of Prey and listen to his remixes and other things (Thanks Jay!)
Click here to check out Kate’s photos from the Commodore
Check out the video of Fine Mist performing their song “Because of the Ocean” at the Commodore, where they opened for Sloan
Great work, Janos!
Posted on December 23, 2009 at 6:58 pm.
Thank you again Janos!!!!!!!!!!!!!!!!!
I should say Jay Division is from last year. The new one is called Bird of Prey and it’s
here.
Posted on December 23, 2009 at 8:13 pm.